

Scale modelling can look and feel like you need to rob a bank just to get started. The models aren’t cheap (and they’re not getting any cheaper). But the tools… damn, the tools could bankrupt you twice over if you let them. And neither of us want that to happen.
When you’re starting out (or coming back) and want to peep behind the curtain, it’s best to start light. A first build, and several after it, can be finished to a good standard with a handful of inexpensive tools — provided you know what each one does and how to use it properly.
This guide covers exactly that. Let’s get straight into it.
The core scale modelling toolkit for beginners
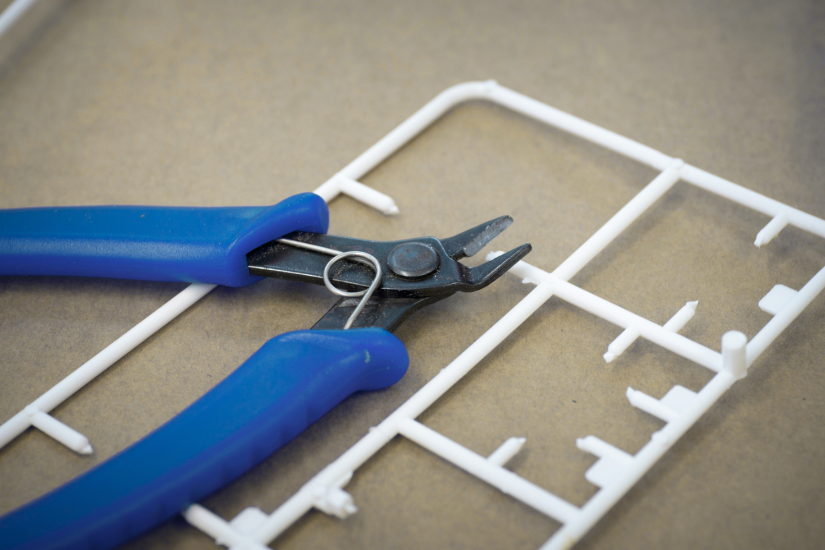
Sprue cutters (nippers)
Every kit part starts out attached to a plastic frame called a sprue. Pulling, twisting, or snapping parts off by hand puts stress on the plastic, and that stress often reveals itself in the final product… errr hello white marks, torn details, or unintentional breakages.
We want to avoid that. Dedicated sprue cutters apply clean, flat pressure instead, so the part comes away spick-and-span.
You don’t need to spend heavily to get a usable pair — a generic set of plastic sprue cutters does the job for a beginner, and there’s little benefit in paying top-dollar for a heavily branded set that performs the same basic cut. When the time comes to upgrade, try single-edge nippers like GodHand or Stedi MS-109.
A small piece of advice when using nippers, though. Don’t cut flush against the part. Leave a small nub of sprue, then trim it with a hobby knife afterwards. Cutting too close in one go is an easy way to turn one part into two. TRUST ME. Your hobby knife will let you fine-cut it far more easily.

Hobby knife
If sprue cutters do the rough work, the hobby knife does almost everything else. My grandad always told me you only need two tools in life: a hammer and a knife. And well, a hammer isn’t much use here.
Your hobby knife will trim the nub left after cutting, scrape away mould lines (the raised seams left where two halves the manufacturing mould set), score plastic, and later trim masking tape and decals. It’s used at nearly every stage of the build.
Choose a knife that takes standard replaceable, X-acto style blades and has a grip you can comfortably hold for a while. Blades should be swapped regularly (a dull blade needs more force to cut, and more force is exactly what leads to slips, damaged pieces and shorter fingers).
A common beginner mistake is using the knife tip to bore a hole by twisting it into plastic; this blunts the tip and leaves a rough, uneven hole. For genuine holes, a pin vice (which I’ll talk about later) does a cleaner job.
Later you might consider favourites like Excel K26 or a Fiskars grip. Weighted metal handles with an anti-roll design are super nice. You could also try curved blades — like a Swann Morton No.3 handle fitted with No.11 blades or No.15 curved blades (for scraping and detail work).
Plastic cement
Ordinary household glue sits on the surface of plastic and can snap under stress. Plastic cement works differently. It’s a solvent that softens the surface of polystyrene, so when you press two parts together, they fuse into one continuous piece as it cures. This gives a stronger, cleaner joint than an adhesive that simply sticks two surfaces together.
Thin liquid cement, applied with the fine brush built into the cap, is easier to control than thicker tube cement, which is prone to being over-applied and can dissolve fine surface detail if you’re not Gary Careful.
A technique worth learning early is to dry fit parts together first, then touch the brush to the seam and let the cement flow in by capillary action.
Two things to know before you start: plastic cement only bonds polystyrene. NOT resin, metal or clear plastic. And it should never touch clear canopy or window parts, since the curing vapours will fog them permanently. Your pilot won’t see out their plane. Maybe a cool effect if the cockpit is melting.

Abrasives (e.g., sandpaper and sanding sticks)
Even a squeaky-clean cut leaves microscopic ridges behind. Sanding smooths these out, blends the seam where two halves meet, and preps the surface before paint. A mixed bag of grits (coarser for shaping and nub removal, fine for final smoothing — so, say, 400 to 1000/1200 grit) covers most beginner needs. These don't need to be expensive; ordinary wet-and-dry sandpaper works perfectly well.
When I was a kid, I ruined part of a cabinet my dad was making because I attacked it with sandpaper like I’d not eaten in a week. Don’t do that. Sand in one direction rather than circular motions, which leaves swirl marks that show through the paint. *Gulps*
On flat surfaces, a rigid sanding stick or block keeps the surface true, since loose sandpaper tends to round off edges under hand pressure. If you’re sanding resin or 3D-printed parts, wet-sand them — this traps the dust in water rather than letting it become airborne, which matters because that dust is genuinely harmful to breathe.
Flexible double-sided sanding sponges (like GodHand or Wowwo) for curved surfaces and metal needle files for more aggressive shaping.
Paint brushes
You don’t need twenty brushes to start. Three shapes cover most of a first build: a fine detail round brush for small features like dials or straps, a general round brush for base coats, and a small flat brush for broad, even coverage and later weathering work. Beginner-friendly water-based acrylic paints are a sensible starting point too. They dry quickly, have low fumes, and clean up with tap water rather than solvent.
Later on, you can upgrade to natural sable-bristle brushes if you move into oil or enamel paints.
Oh, and rinse your brushes immediately after use! Paint that dries near the metal ferrule forces the bristles apart permanently, and a brush that’s lost its point is far harder to control.
A cutting mat
Not glamorous, but worth having from day one. A self-healing cutting mat stops blades slipping, protects whatever surface you’re working on, and keeps blades sharper for longer than cutting directly on a hard tabletop.
I like it because it means I keep my finger tips.
Scale modelling tools worth upgrading later
When the time comes, likely when you’ve felt the frustration the following tools fix, it’s time to upgrade.
Single-edge nippers
Standard double-bladed sprue cutters pinch plastic from both sides, which can still leave faint stress marks. Single-edge nippers cut down onto a flat anvil instead of pinching, producing a noticeably cleaner cut and less sanding afterwards. Worth buying once double-bladed marks start bothering you (which, now you know what to look for, will be soon. Sorry…).
An airbrush and compressor
Hand-brushing and spray cans are the sensible starting point for painting — airbrushing adds variables like air pressure and paint thinning ratios that are easier to learn once you already have basic brush control. They can also become quite pricey.
It’s worth upgrading when you find it consistently hard to get a smooth, streak-free base coat by hand, or want a soft-edged camouflage and colour gradients that just aren’t realistic to achieve freehand. A modest starter airbrush and compressor combination is enough to learn on. Once you’re locked in with that, you can look to upgrade again.
r/modelmakers is a goldmine for advice for airbrushes. Worth a visit after ours (wink-wink).
Better tweezers
Cheap tweezers are often made from soft, stamped metal (i.e., blasphemy here) that bends out of alignment, which can cause small parts to spring out of your grip unpredictably. If you don’t mind staying up-close-and-personal with your floor, though, crack on.
Stainless steel tweezers with properly aligned tips are worth the upgrade once you’re regularly handling small or fiddly parts, and non-magnetic tips matter if you ever work with photo-etched metal.
A pin vice and micro-drill bits
Useful once a build calls for hollowing out a barrel or exhaust, or pinning a heavy part with a length of wire for extra strength. Not necessary for straightforward out-of-the-box builds.
Scribing tools
Used for restoring or adding fine panel-line detail — a want once you're modifying kits rather than building them as designed.
Proper modelling clamps
Rubber bands and clothes pegs genuinely do the job for most joints. Dedicated clamps with self-aligning pads become worth it once you’re working on awkward angles that keep slipping out of a simple clamp.
(Part of) the MetMo collection
We also have some tools you might consider yourself:
MetMo Fractal Vise
A vice earns its place in the “worth having eventually” pile. Most vices struggle to hold irregular, oddly shaped or delicate parts while your glue cures. Not ours. Our fractal vice tackles this with interlocking jaws that move independently and reshape themselves around whatever you clamp. See:

MetMo Multi Drive
It looks like a (really cool) pen and feels like a (really cool) pen, but it’s not a pen. The body accepts swappable heads — like a scalpel, scribe tip, hex driver, lead holder for sketching. The ultimate multi-tool for scale modellers, especially if space is tight.

MetMo Pocket Grip
Built around the same adaptive jaw mechanism as the Fractal Vise, just shrunk down into a pocket-sized multi-tool. It's a 5-in-1 clamping machine that you should definitely look at. A lovely bit of kit, if I do say so myself.

Building your toolkit gradually
The tools above cover the vast majority of what a first build — and several after it — require. Everything else on a modelling supplier’s shelf can come home with you once a specific build asks for it.
I mean, I’m not going to stop you buying more tools. That would be rather contradictory with everything I’ve accumulated over the years. But you don’t necessarily need them… yet, anyway.
Start with the essentials, use them properly, and let your next few kits tell what you want to buy next. Your taste and interests will have a big role in this too. A simple toolkit, well understood, will get you further than a large one you haven’t yet learned to use.
I hope you enjoyed reading. Let us know what tools you bought first over in our MetMo subreddit or CubeClub forum.
Oh, and if you want to see about the history of model making tools, try this.
Until the next one!

Share:
Where to find antique hand tools in the 21st century